
How to Read House Blueprints: A Homebuyer's Guide
- Justin McCurdy

- Sep 2, 2025
- 13 min read
Updated: Sep 12, 2025
So, you've just been handed a thick, rolled-up set of house blueprints. It can feel like you're trying to decipher some ancient, secret code, but I promise it's not as complicated as it looks. The key is knowing where to start.
Your first move? Find the title block. Think of it as the project's ID card. Next, hunt down the legend—this is your personal decoder ring for every symbol, line, and abbreviation you'll see on the following pages.
Why Blueprints Are Your Best Friend
A set of blueprints is basically the instruction manual for your future home. It’s the single source of truth that turns a dream on paper into a physical structure, making sure everyone from the architect to the framers and electricians are all building the exact same house. Getting comfortable with these documents is the first real step to picturing your life inside those walls.
This isn't just a handy skill; it's the language of a massive industry. The global residential construction market is valued at a staggering USD 4.92 trillion, and every single one of those projects runs on these precise documents. It’s a market that’s only getting bigger, and blueprints are the foundation it’s all built on. You can read more about the residential construction market to see just how critical these plans are on a global scale.
Your Starting Points: The Title Block and Legend
Before you get lost in the fun stuff like room layouts and window placements, you need to get your bearings. Every set of plans has two crucial starting points that will guide you through the rest of the set.
The Title Block: Look for a box, usually tucked away in the bottom right corner of the first page. This is where you'll find all the high-level project info: the plan name, the address or lot number, and who designed it. It’s the who, what, and where of your build. For example, it might say "The Chesapeake Plan, Lot 24, White Marsh, MD."
The Legend (or Key): This is your Rosetta Stone. It’s a chart that explains what every single symbol, line type, and abbreviation means. It's how you'll know the difference between a door and a window, or learn that "W/D" means a washer and dryer hookup is planned for that spot.
Once you’ve familiarized yourself with the title block and legend, you're not just looking at random lines anymore. You're learning the language of your future home, which makes deciphering every other page a whole lot easier.
While the builder I represent provides high-quality homes, I go a step further. I don't just hand over a stack of paper. I offer my clients unique customization tools and visualizers that bring these black-and-white drawings to life. We can play around with how different flooring, cabinets, or countertops will look, turning the blueprint into a launchpad for your personal style.
Now, let's get a quick overview of what you'll find in a typical set of blueprints. This table breaks down the essential parts so you know what to look for and why it matters.
Key Blueprint Components at a Glance
Component Name | What It Tells You | Why It's Important |
|---|---|---|
Title Sheet / Cover Page | Project name, address, designer/architect info, and a drawing index. | This is your navigation page. It tells you what drawings are included and where to find them in the set. |
Site Plan | Shows the entire property, including the house's position, property lines, driveways, and utilities. | Crucial for understanding how your home sits on the land and its relationship to the surroundings. |
Floor Plans | A top-down view of each level, showing rooms, walls, doors, windows, and dimensions. | This is the heart of the design. It's where you see the layout and flow of your daily life. |
Elevations | Exterior views of the house from all four sides (front, back, left, right). | Shows you what the finished house will look like from the outside, including materials and rooflines. |
Sections | A "cut-through" view of the house, showing how the structure is built from foundation to roof. | Reveals hidden details about construction, insulation, and the relationship between different floors. |
Schedules & Notes | Lists of specific materials, finishes, doors, windows, and lighting fixtures. | The "fine print" that details every specific item going into the home, preventing guesswork. |
Getting a feel for these different components will make your journey through the blueprints much smoother. Each one tells a different part of your home's story.
Decoding Floor Plan Lines and Symbols
Think of your floor plan as a map to your future home. It’s like you’re a giant, peering down from above after the roof has been lifted clean off. Every single line and little drawing on that page tells a piece of the story—where the walls stand, which way a door swings, even where you’ll plug in your coffee maker.
Getting a feel for this "language" is the key to understanding how you'll actually live in the space. It’s absolutely vital, especially in a building industry where one tiny mistake on paper can turn into a huge, expensive problem down the road. Being able to read these plans is a massive part of staying in control during construction, a field that's only getting bigger. You can even read the latest housing market index data to get a sense of how much activity is happening right now.
Lines: The Bones of the House
First things first, not all lines are created equal. Their thickness and style tell you exactly what you're looking at. It sounds complicated, but it's pretty intuitive once you see it a few times.
Thick, solid lines are your exterior walls. These are the big, structural walls separating your cozy interior from the outside world.
Thinner, solid lines represent your interior walls. Think of the wall between your bedroom and the hallway, or the one that creates a pantry in the kitchen.
Dashed or dotted lines show things that are above the floor. A classic example is a dashed line showing the edge of your upper kitchen cabinets or a decorative archway that doesn't go all the way to the floor.
This graphic is a great way to visualize the process of reading a floor plan. It breaks down how to see the big picture.
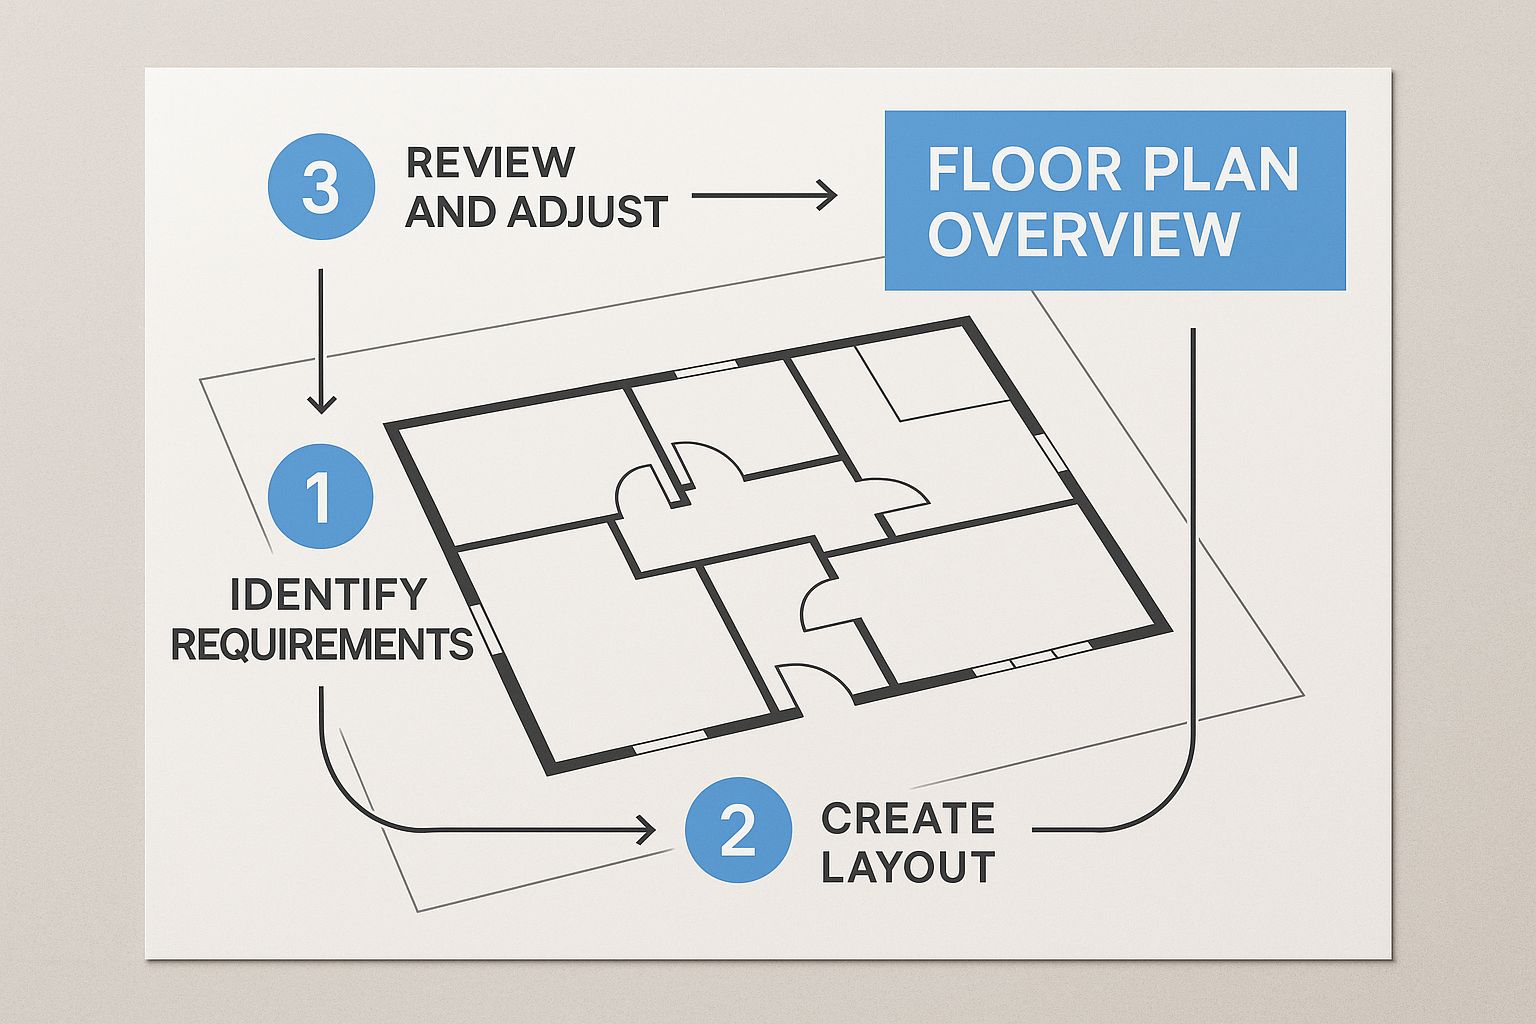
Starting with the walls, then looking at doors and other features, you can quickly translate a flat drawing into a three-dimensional space in your mind.
Symbols: The Shorthand for Features
Okay, beyond the lines, you'll see a bunch of symbols. These are the little icons that pack a ton of information into a small space. Your blueprint will have a legend (or key) that defines them, but you’ll pick up on the common ones fast.
Take doors, for instance. A door is usually a straight line perpendicular to the wall, with an arc showing which way it swings. That little arc is a game-changer. It tells you exactly how much clearance you need, which is critical when you're planning where to put your bookshelf so it doesn't block the entryway.
Windows are usually shown as breaks in the wall, often with a few thin lines inside to represent the panes of glass. You'll also spot symbols for everything from staircases and kitchen sinks to electrical outlets.
Once you get the hang of these basic symbols, you can start to "walk through" the home on paper. You can really begin to imagine where the sofa will go or how much room you have to maneuver around the kitchen island.
These builder blueprints are incredibly powerful, but they’re just the beginning. I give my clients access to some amazing visualizer tools that take things to the next level. We can actually play with different flooring, countertop, and cabinet styles to see how your personal choices will look in the finished space. It’s all about turning these lines and symbols into a home that is 100% you. For more on this, take a look at our post on a friendly guide to next-gen home floor plans.
Making Sense of Scale and Dimensions
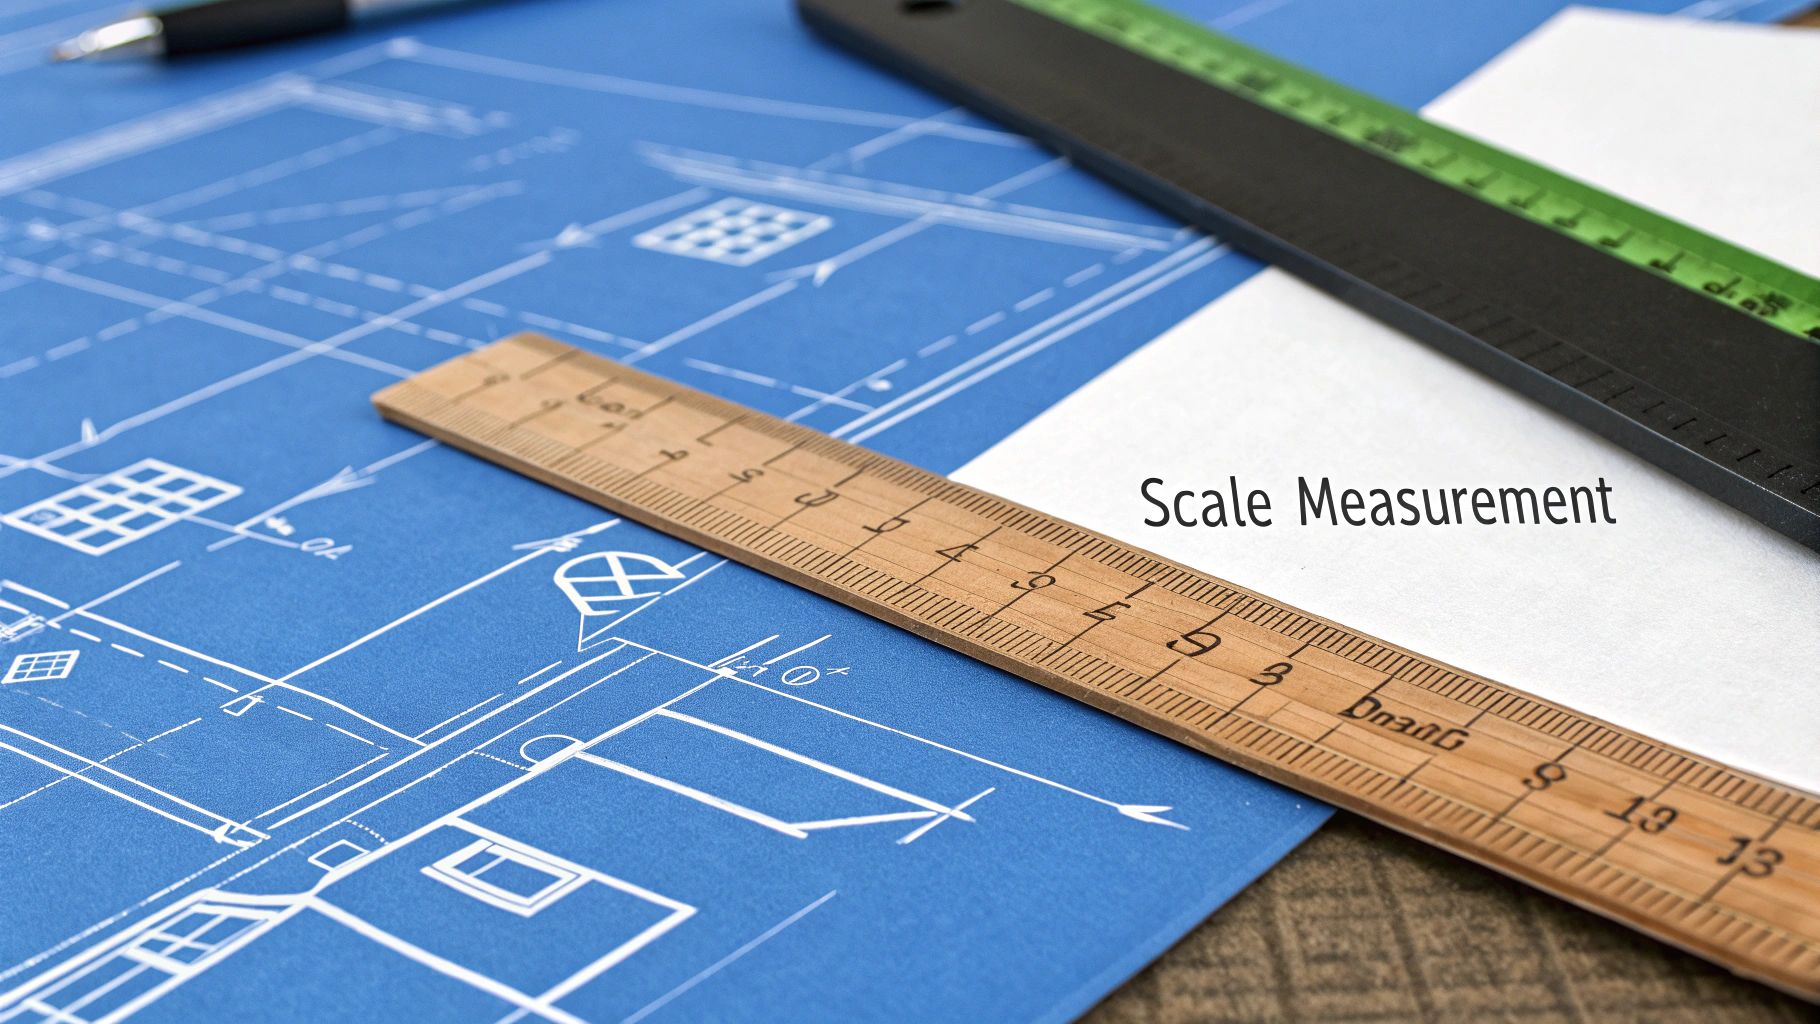
Alright, you've got the basics of lines and symbols down. Now let's dive into something that often throws people for a loop: scale. Think of it this way: a blueprint is just a perfectly shrunk-down version of your future home. The scale is the secret code that tells you how to translate the drawing back into its real-world size.
Without understanding scale, you’re essentially just looking at a pretty picture with no context.
For most residential plans, you're going to see a scale of ¼” = 1’-0”. It’s the industry standard for a reason. All it means is that for every quarter-inch you measure on the paper, it represents one full foot in the actual house. So, if a wall on the blueprint measures exactly one inch long, you know that wall will be four feet long once it's built. Simple as that.
This little conversion is the key to unlocking the true feel of your space. It's how you'll figure out if your king-sized bed will actually fit with two nightstands, or if that giant farmhouse table you've been eyeing will leave any room to walk around.
Reading the Dimension Strings
Now, the good news is you don’t have to sit there with a ruler measuring every single line. Architects make our lives easier by including dimension strings. These are the lines you see running parallel to walls and other features, with tick marks and numbers all along them. They take all the guesswork out of it by giving you the exact measurements.
You'll see a long line with little perpendicular tick marks at each end, pointing to exactly what's being measured. The number sitting on that line is the precise, real-world length.
For example, a dimension string might read 12'-6". This tells you the feature—whether it's a wall or an opening—is exactly 12 feet and 6 inches long. No need to break out your scale ruler; the plans spell it out for you.
A Practical Tape Measure Trick
Here’s a little tip I share with all my clients to help make the space feel real. Grab a regular tape measure and look at the tiny ¼” mark. For a moment, just pretend that little mark represents one foot.
Find a room on the blueprint, like the primary bedroom. Let's say it measures 4 inches long on the page.
Since the scale is ¼” = 1’-0”, you know that the room is 16 feet long in real life (4 inches x 4 feet per inch).
This hands-on method really helps connect the dots between the flat drawing and the three-dimensional room you’ll eventually live in. It's a crucial part of the journey, which we talk about more in our guide to designing your dream home.
Getting a true sense of each room's size is absolutely vital. When you work with me, we take this a step further. I provide access to high-quality visualizer tools that let you see exactly how your flooring or cabinet choices will look within those specific dimensions, ensuring every single decision brings your vision to life.
Visualizing Your Home in 3D
Floor plans are fantastic for figuring out the layout, but let's be real—we don't see our homes from a bird's-eye view. That's where elevations and section drawings come in. They’re the key to translating that flat, two-dimensional plan into a realistic picture of your future home in your mind's eye.
These drawings add the crucial elements of height and depth. They show you what the house will actually look like when you're standing on the curb or walking from room to room. It's the difference between looking at a road map and seeing a photograph of the destination.
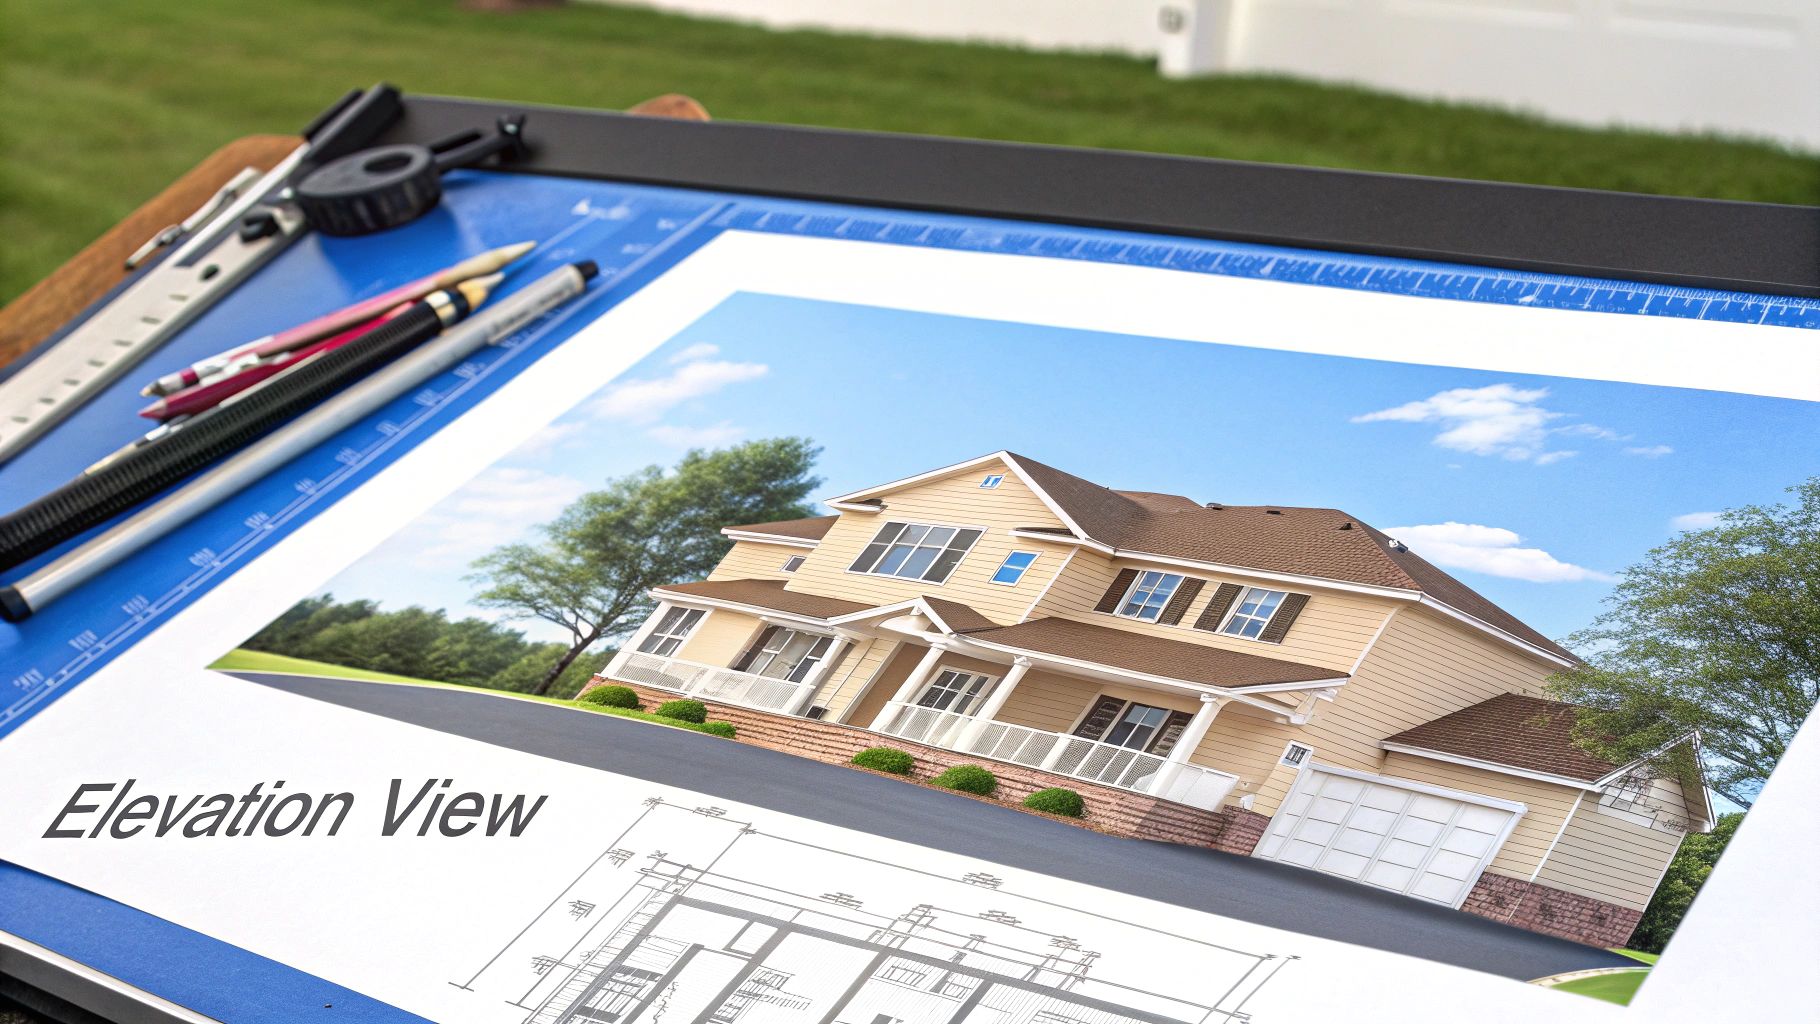
What Are Elevation Drawings?
Think of elevations as straight-on portraits of your home's exterior. Your blueprint set will usually have four of them: one for the front, rear, left, and right sides. These drawings aren't about room dimensions; they're all about character and curb appeal.
On the elevations, you’ll get a clear picture of:
Exterior Finishes: This is where you see if the plan calls for classic siding, timeless brick, or a modern mix of materials. The elevations show exactly where everything goes. For instance, it might show brick on the bottom half of the front and siding on the top.
Window and Door Styles: You'll see the precise shape, style, and placement of every window and door, which really gives you a feel for the home's personality.
Rooflines and Pitch: This view details the slope of the roof, the location of gables, and other architectural details that make your home stand out.
Basically, if you were to stand on the sidewalk and look at your finished house, you’d be seeing the front elevation in real life.
Slicing the House Open with Section Drawings
Now for the really cool part: section drawings. Imagine taking a giant knife and slicing your house right down the middle, like a layer cake. A section drawing shows you what the inside of that "slice" looks like. It’s a powerful cut-through view that reveals the home’s inner workings from top to bottom.
These views are invaluable for understanding how the vertical spaces work together. They show you things you just can't grasp from a floor plan, like the ceiling heights in different rooms, how the second floor sits on the first, and the construction of the roof and foundation.
A section view is your best tool for visualizing the volume of a space. It helps you answer questions like, "How tall will the ceilings feel in the great room?" or "How do the stairs connect the different levels?"
Getting a feel for these different drawings is the secret to seeing the complete picture. To help you keep them straight, here's a quick comparison of what each one brings to the table.
Blueprint Views Explained
Drawing Type | What It Shows | Best For Visualizing |
|---|---|---|
Floor Plan | A top-down, bird's-eye view of one level. | The layout, room flow, and how you'll move through the space. |
Elevation | A flat, straight-on view of an exterior side. | Curb appeal, window placement, and exterior materials. |
Section | A cut-through view from foundation to roof. | Ceiling heights, the connection between floors, and structural details. |
Each view tells a different part of the story, helping you piece together a complete vision of your new home before the first shovel ever hits the ground.
While these technical drawings provide the architectural skeleton, my job is to help you flesh it out with your personal style. I provide access to unique visualization tools that let you see exactly how your choices for flooring, cabinets, and countertops will look in your new space. It’s a hands-on service that turns these blueprints into a home that's truly yours, whether you're building in White Marsh, Edgewood, or anywhere across Baltimore and Harford counties.
Bringing Your Vision to Life
Blueprints are the skeleton of your new home, but let's be real—a house is more than just lines on paper. Once you've got a handle on the layout, scale, and structure, the real fun begins. This is where you get to pour your personality into the expertly designed spaces you see on the plans.
While the builder I represent provides high-quality homes, I go a step further—offering my clients unique customization tools, hands-on service, and access to visualizers that help you bring your dream space to life.
From Blueprint to Beautiful Reality
I give my clients access to some amazing visualization tools that let us move way beyond the simple black-and-white plans. Forget trying to imagine how everything will look; you can actually see it all come together digitally.
Picture this: we sit down together and start playing with your home's interior. You can click through different flooring options, instantly comparing a light oak laminate to a rich, dark hardwood. We can mix and match countertops and cabinets until we land on the perfect combination for your dream kitchen.
It’s all about making decisions you feel great about. This process helps you:
See Your Finishes Together: No more guesswork. You'll see exactly how that backsplash tile you love looks next to your chosen granite countertops before anything is ordered.
Test Different Styles: Torn between classic subway tile and a funky hexagonal pattern for the primary bathroom? Now you can see both in a realistic rendering and pick a clear winner.
Finalize Your Palette: We can make sure the colors and textures of your cabinets, floors, and wall paint all complement each other perfectly.
The whole point is to take the anxiety out of the design process. It ensures the final product isn't just a house built to spec, but a home that reflects your personal style from the second you get the keys.
Making Your New Home Your Own
This customization stage is the bridge between understanding how to read a floor plan and actually living in a space you absolutely adore. We’ll work together to turn those technical drawings into a home that fits your life, whether you’re looking for a new place in White Marsh, Edgewood, or anywhere across the beautiful communities of Baltimore, Harford, and Prince George's counties.
Picking out these selections is exciting, but it’s also a big part of your budget. For a little help balancing your dream features with your finances, check out our guide on how much house you can afford. It’s a fantastic resource for planning everything out.
My commitment is to give you the tools and personal guidance you need to make smart, inspired choices. Together, we'll make sure every detail, from the flooring under your feet to the cabinets you open every morning, is exactly what you dreamed of. Let’s get started.
Still Have Questions About Reading House Plans?
Even after you get the hang of reading house plans, a few questions always seem to pop up. It's totally normal! Here are some of the most common ones I hear from homebuyers when they first sit down with the plans for their dream home.
Which Page Should I Focus on the Most?
Every page in a set of blueprints is vital for construction, but for you as the homebuyer, the floor plan is king. It gives you that bird's-eye view of the layout, showing not just the room dimensions but, more importantly, the flow from one space to another.
This is the sheet that really dictates your daily life in the home. It’s where you’ll start picturing where the couch will fit, how you’ll move around the kitchen island while cooking, and whether the kids have a good spot for homework. My advice? Spend most of your time right here.
Is It Too Late to Make Changes Once the Plans Are Done?
This is a big one. Trying to make changes after the blueprints are finalized and especially after construction begins can get complicated—and expensive—very quickly. It's always best to nail down all your personalization choices before we break ground.
My whole process is designed to avoid this headache. I give you powerful visualization tools to help you confidently pick your flooring, countertops, cabinets, and tile well in advance. This way, we minimize the chance of costly, last-minute changes and make sure you love your home from day one.
What if I See a Symbol or Note I Don't Recognize?
Never, ever hesitate to ask! Your first stop should be the legend or key, which is usually on one of the first few pages of the blueprint set. This is your decoder ring for most of the shorthand, like ‘W/D’ for washer/dryer hookups or ‘WH’ for the water heater.
If you’ve scanned the legend and are still stumped, that’s what I’m here for. My job is to make sure you feel completely in the loop and comfortable during this whole exciting process. I’m always happy to walk you through any detail on your plans, no matter how small it seems.
For more answers, we’ve also put together a ton of useful information on our page with Reasons to buy a new home and the Dos and Don'ts when getting a home loan.
My hands-on service is all about taking the mystery out of the home buying process. We’ll go through everything together so you can move forward with total confidence in the beautiful home we’re creating in communities across White Marsh, Edgewood, and greater Baltimore, Harford, and Prince George's counties.
Ready to see those lines on paper become a home that's all you? I provide the tools and personal service to help you select the perfect flooring, countertops, cabinets, and tile for your new space. Let's start bringing your vision to life today! Visit us at https://www.customizeyourhome.com.
Comments