
What Is Rough In Plumbing and Why It Matters
- Justin McCurdy

- Dec 14, 2025
- 10 min read
Before you ever turn on a faucet or flush a toilet in your home, a complex network of pipes has to be carefully laid out and connected. This is the heart of what we call rough-in plumbing. Think of it as creating the circulatory system for your home, all installed long before the drywall covers it up.
Your Guide to Behind-the-Walls Plumbing
Imagine building the skeleton of a house before adding the "skin" of drywall and paint. That's a perfect way to picture rough-in plumbing. It’s the foundational stage where all the water supply lines, drain pipes, and vent stacks are run through the open wall studs, floor joists, and ceiling trusses.
This hidden network is the groundwork for every single fixture you'll eventually use, from the kitchen sink to the washing machine and the master shower. For example, the pipe that will eventually connect to your kitchen faucet is put in place during this phase.
Getting this phase done right is non-negotiable. Why? Because once the walls are closed up, making changes becomes a messy, expensive headache. This stage is a critical piece of the puzzle in any new home, something we cover in more detail in our guide to the new home construction process.
To really understand where the rough-in fits, it helps to see the whole picture. The entire plumbing installation for a new home is typically broken down into three distinct phases.
The Three Main Phases of Home Plumbing
Plumbing Phase | What Happens During This Stage | Main Goal of This Phase |
|---|---|---|
Phase 1: Underground Rough-In | Before the foundation slab is poured, all the underground drain and water pipes are laid out in trenches. | To place all plumbing that will sit beneath the concrete foundation of the home. |
Phase 2: Above-Ground Rough-In | This is the main "rough-in" stage. After framing is up, pipes and water lines are run through walls, floors, and ceilings to connect to future fixture locations. | To create the complete, hidden plumbing network that will service the entire house. |
Phase 3: Finish (Trim-Out) | After drywall, painting, and flooring are complete, plumbers return to install all the visible fixtures like faucets, toilets, sinks, and showerheads. | To connect the visible fixtures to the pre-installed rough-in plumbing and make the system functional. |
As you can see, the rough-in is the critical middle step that connects the underground work to the final fixtures you'll use every day.
The Unseen Foundation
The term 'rough' is actually pretty fitting. This work isn't about the pretty, polished chrome fixtures you see in a finished home. It's all about the hardworking, essential pipes that make everything function behind the scenes.
It's a massive undertaking that supports the entire $158.6 billion US plumbing market. Every single faucet and toilet relies on this foundational work being done correctly.
This is the stage where the blueprint truly comes to life. The precise placement of a single drain line dictates the final location of your kitchen island or bathroom vanity. Meticulous planning here is what ensures your finished home isn't just beautiful, but also perfectly functional for years to come.
What a Plumbing Rough-In Actually Includes
So, what’s really going on behind the walls during a plumbing rough-in? It's all about laying the groundwork. This is the stage where a plumber installs the three essential systems that handle all the water flowing in and out of your home. Think of it as the central nervous system for your house's water.
The Three Core Systems
First up are the water supply lines. These are the pipes responsible for bringing fresh, clean water to all the places you'll eventually have a faucet, shower, or appliance. For example, a plumber will run two separate lines to your future laundry room—one for hot water and one for cold—so your washing machine can connect perfectly. You'll see smaller-diameter pipes, often made from flexible PEX or traditional copper, branching out to deliver both hot and cold water. This is also the perfect time to think about big-ticket items, so checking out a guide on choosing a water heater beforehand is a smart move.
Next, you have the Drain-Waste-Vent (DWV) system. This is the "outflow" part of the equation. Made of larger PVC pipes, this network is built to carry used water and waste away from your home. The key here is gravity. Plumbers install these pipes with a very specific downward slope—usually about a quarter-inch per foot—to ensure everything flows smoothly out to the sewer or septic system.
Finally, there are the vent pipes. These are the unsung heroes of your plumbing. They run from the drain lines all the way up through your roof, and their job is simple but critical: regulate air pressure. Vents stop your drains from making those gurgling noises and, more importantly, they prevent nasty sewer gases from backing up into your house. A practical example is the pipe you see sticking out of your roof—that's a vent doing its job!
This diagram really clarifies how the rough-in is the critical first step, setting the stage for all the visible parts you'll see later.
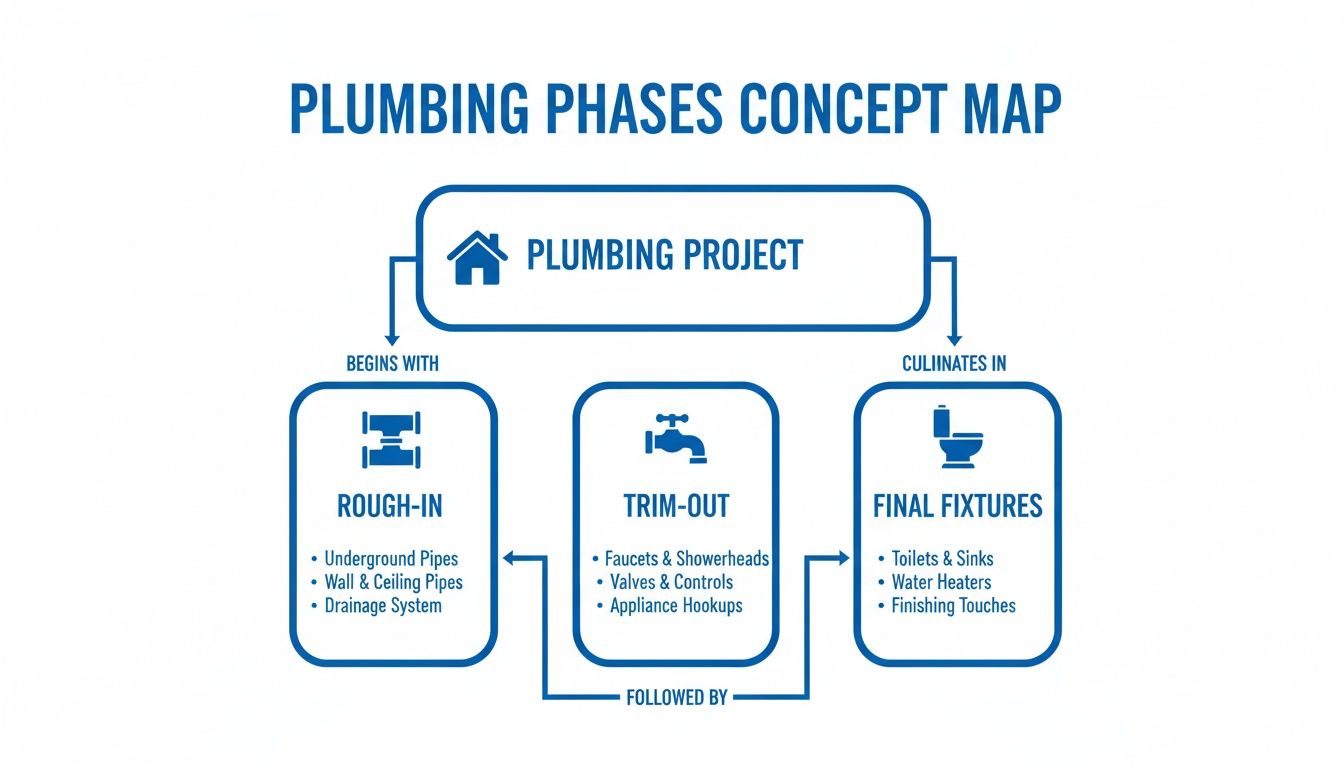
As you can see, this phase is all about the hidden infrastructure. It’s the foundation that makes installing sinks, toilets, and showers possible down the road.
Getting this stage right is crucial. A poor rough-in job can lead to serious headaches, with leaks wasting up to 10,000 gallons of water for a single household every year. To get a better handle on the nuts and bolts, this comprehensive plumbing installation guide is a great resource. It's a massive field, after all—the plumbing fixtures and fittings market was valued at a whopping $89.8 billion in 2023.
Why Getting the Rough-In Right Is So Crucial
Think of the rough-in plumbing phase as creating the skeleton for your home's entire water system. It’s your one shot to get the foundation perfect before the walls and floors go up. A small mistake here doesn't just stay small—it gets buried, only to become a massive, expensive headache later on.
Imagine you've just picked out stunning tile for your new bathroom. You're picturing the final look, but then the installers arrive and discover the shower drain is two feet off from where it needs to be. The only fix? Tearing out brand-new work, which eats up your time, your budget, and your sanity.
Nailing the rough-in is how you prevent these kinds of nightmares. It’s what ensures you won't have to hunt down mystery leaks, that you'll always have strong water pressure for a good shower, and that your drains work quietly without any weird gurgling sounds.
The All-Important Inspection
One of the most vital parts of this whole process is the rough-in inspection. This isn't just a friendly suggestion—it’s a mandatory stop sign on your construction journey.
Before any drywall goes up, a local building inspector will come out to the site. Their job is to put an expert eye on every single pipe and connection to make sure it all meets strict safety and building codes.
They're looking at things like:
Pipe Connections: Are all the joints sealed up tight to prevent even the smallest leak?
Drain Slopes: Is every drain pipe pitched just right so gravity can pull waste away effortlessly?
Fixture Placement: Are the pipes exactly where the sinks, toilets, and tubs are supposed to go?
Passing this inspection is a huge relief. It’s the official thumbs-up confirming that the hidden plumbing guts of your house are safe, correct, and built to last. This checkpoint is a core part of the overall approval process, so it really helps to understand what a building permit is and why homeowners need one.
Getting the rough-in right also means you're following the letter of the law. Knowing the essential building regulations for fixture installations, for instance, is absolutely critical for passing inspection and avoiding the dreaded order to tear it all out and start over.
Choosing the Right Pipes for the Job
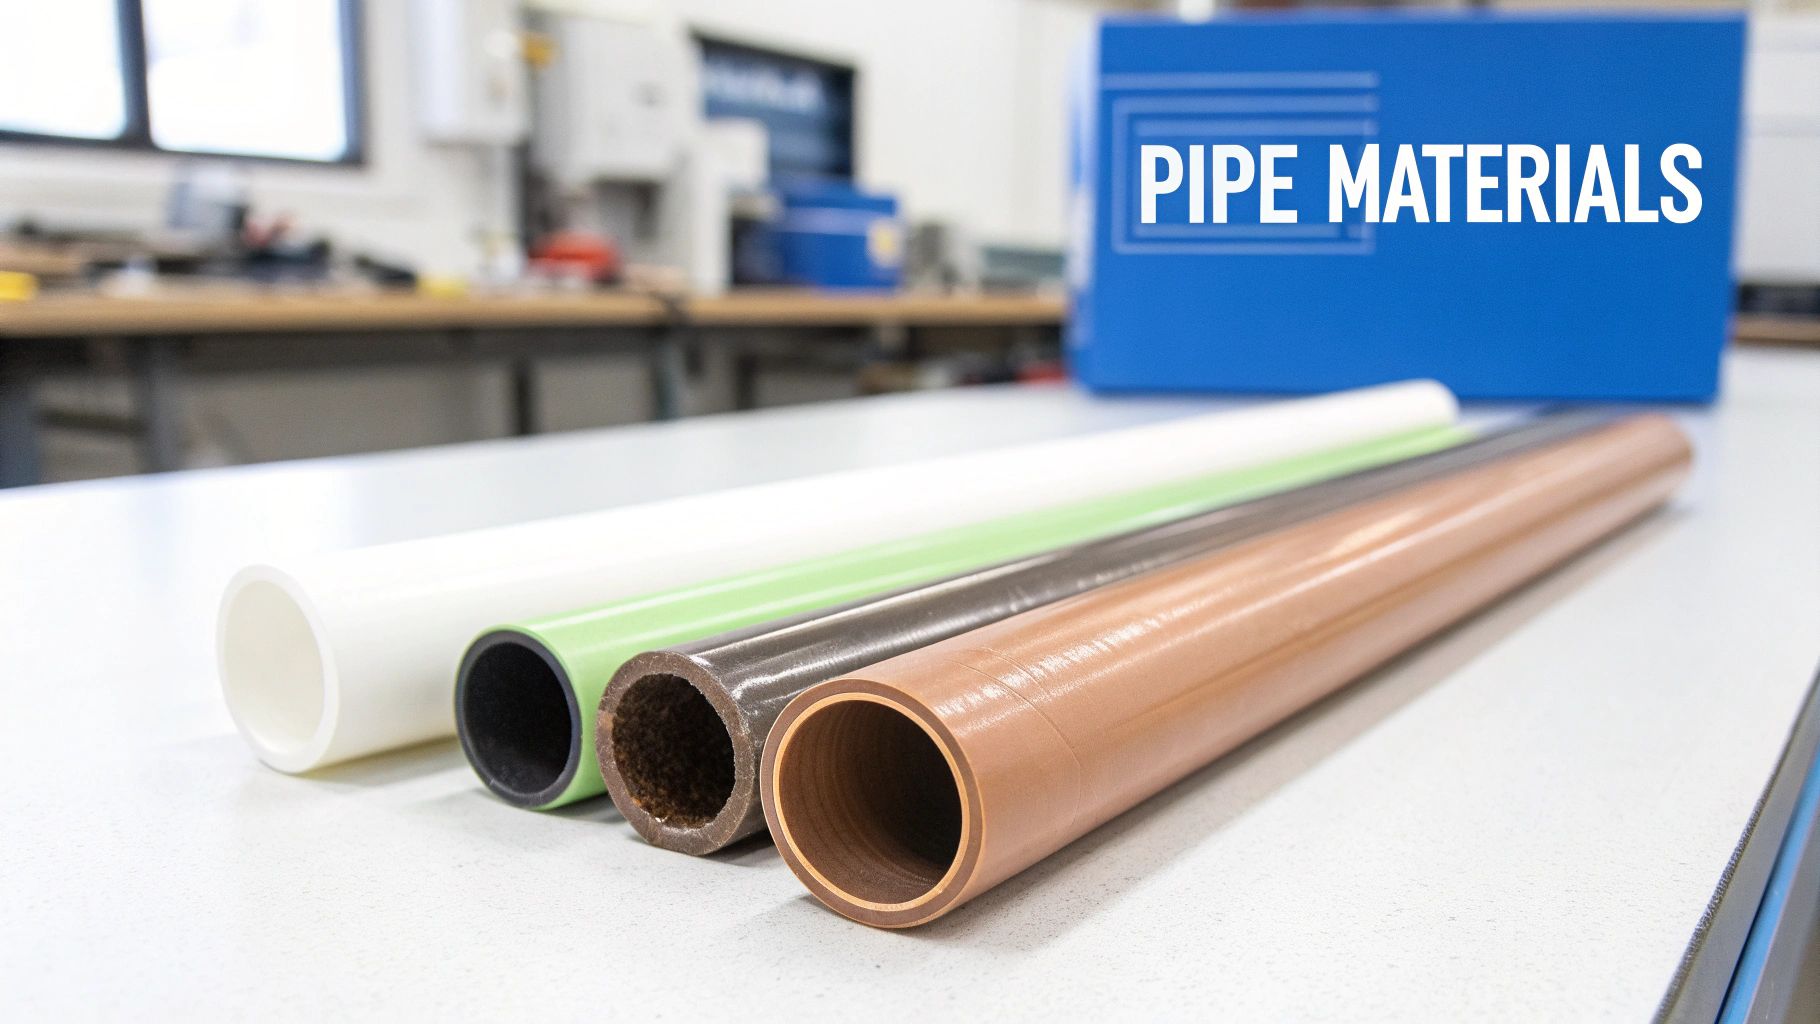
When your walls and floors are open during the rough-in stage, it can look like a maze of colorful plastic and metal pipes. It’s not random, though—every type of pipe has a very specific job to do. Picking the right material is crucial for building a plumbing system that will work perfectly for decades to come.
So, let's break down the most common materials you'll see snaking through your home's framework.
Modern Plastic Solutions
These days, you'll almost always spot flexible plastic tubing, called PEX (cross-linked polyethylene), winding through the wall studs. It's become a go-to for water supply lines because it's way easier and faster to install than old-school rigid pipe. A huge bonus, especially for us here in Maryland, is that PEX is more resistant to bursting if the pipes freeze.
For the bigger drain and vent lines, plumbers typically reach for rigid plastic pipes like PVC (polyvinyl chloride) or ABS (acrylonitrile butadiene styrene). They are tough, affordable, and perfectly suited for carrying all the wastewater safely out of your home.
The Tried-and-True Classic
Of course, we have to talk about copper. For generations, copper was the undisputed champion for water supply lines, prized for its amazing longevity and reliability. It's definitely more expensive and takes more skill to install than PEX, but many still consider it a premium choice for its sheer durability.
To help you keep track, here’s a quick rundown of the most popular pipe materials and what they’re best for.
A Quick Look at Common Rough-In Pipes
Material Type | Where It Is Commonly Used | Its Main Advantage |
|---|---|---|
PEX | Hot and cold water supply lines | Flexibility and freeze resistance |
PVC/ABS | Drain, waste, and vent lines | Durability and affordability |
Copper | Hot and cold water supply lines | Exceptional longevity and reliability |
Ultimately, picking the right pipe isn't just about the price tag; it's about getting the best performance for the job.
The material a plumber chooses isn't just about cost—it's about performance. A flexible PEX pipe can snake around corners without extra fittings, while the rigid strength of PVC is exactly what you need for a perfectly sloped drain line that will function flawlessly for years.
Getting a handle on these materials really helps you picture the finished project. As you start thinking about where you want your sinks and showers, you can learn more about how to plan your bathroom remodel with our stress-free guide. By investing in quality materials during the rough-in, you’re making sure the hidden guts of your home are just as solid as the beautiful finishes you'll see every day.
How Rough-In Plumbing Shapes Your Dream Space
It's easy to get bogged down in the technical details of pipe types and drain slopes, but the rough-in phase is actually where the fun begins. This is the stage that connects all that behind-the-walls work to the exciting part of designing your home—making it truly yours.
Think about it: the location of those hidden water lines and drain pipes determines exactly where your dream fixtures can go.
Want a gorgeous kitchen island with its own prep sink? That has to be mapped out in the rough-in plan. Dreaming of a luxurious freestanding tub as the star of your bathroom? Its final spot depends entirely on where we install the water supply and drain lines in the floor.
This is why planning is everything. One misplaced pipe can force a major compromise on your final layout, completely changing the look and feel you were going for. It's the critical link between the unseen infrastructure and the beautiful, functional space you'll live in every single day.
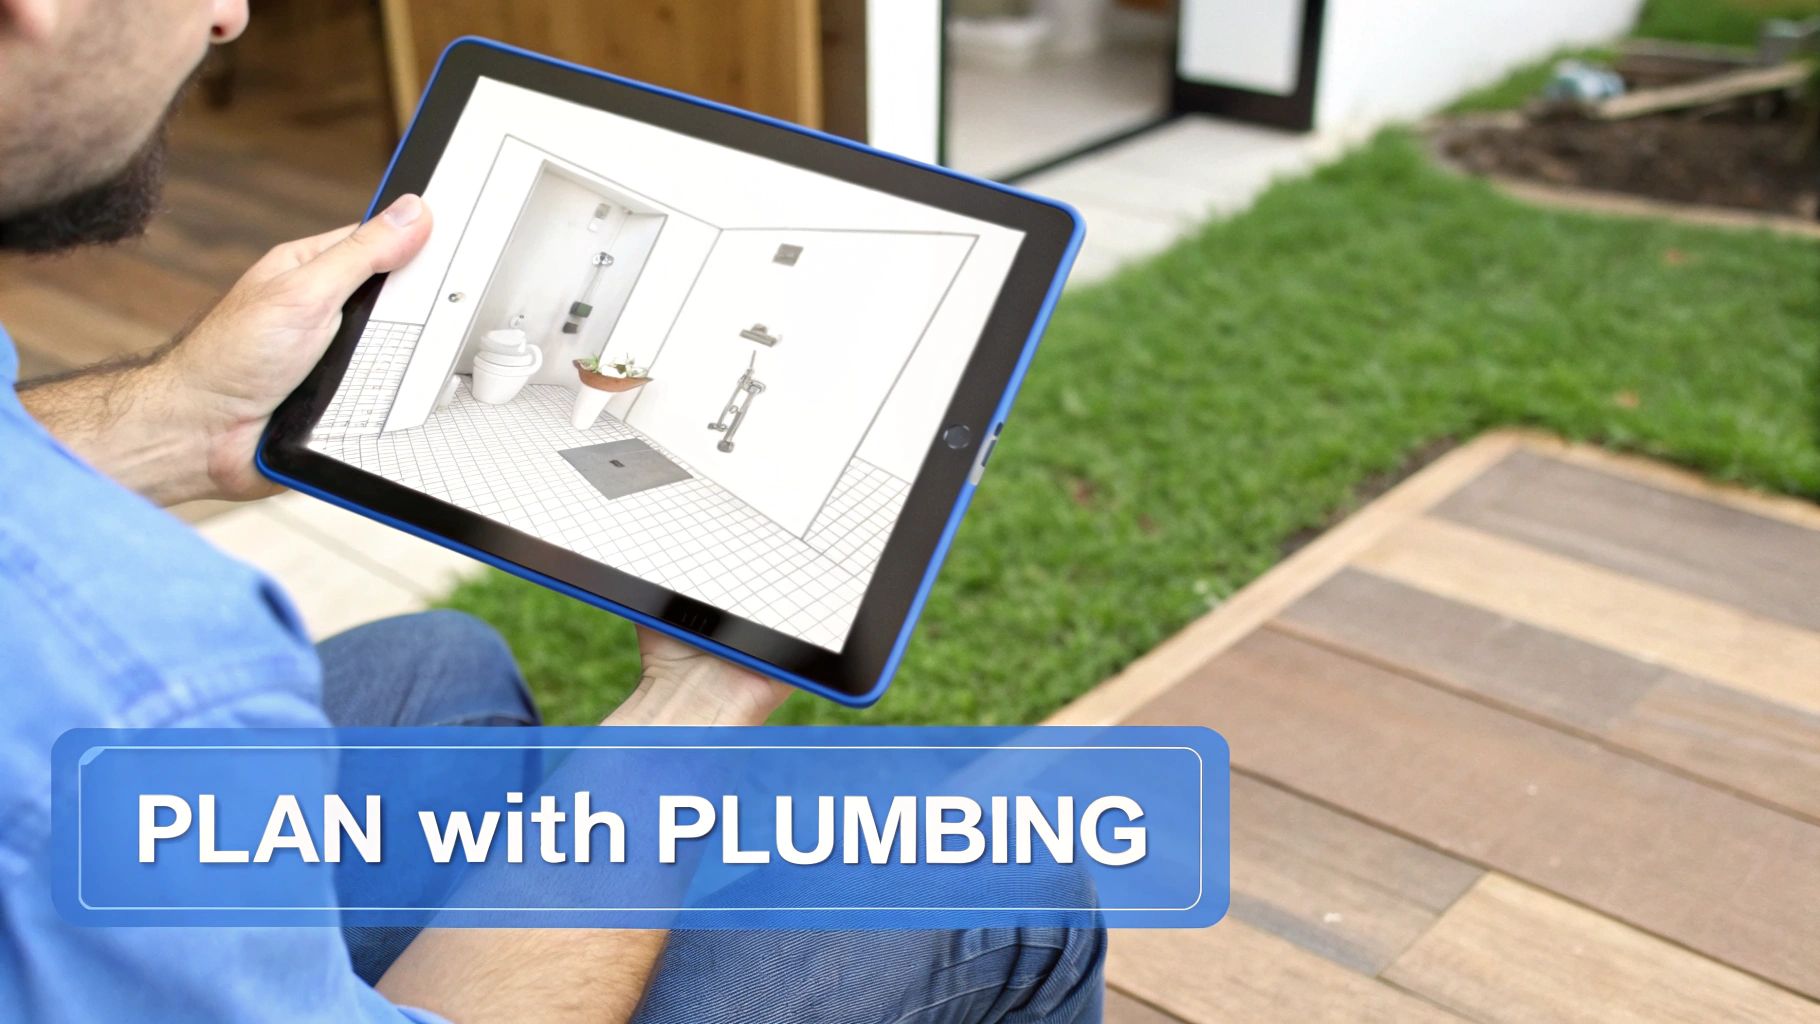
Visualizing Your Perfect Layout
What if you could see it all come together before a single pipe is cut? Instead of just squinting at a 2D blueprint, you could walk through your new space virtually. While the builder I represent provides high-quality homes, I go a step further—offering my clients unique proprietary visualization tools, hands-on service, and access to visualizers that help you bring your dream space to life.
With our 3D visualizers, you can:
Explore different kitchen layouts: See exactly how that island sink will look and function alongside your countertops and cabinets.
Design your ideal bathroom: Test out the placement for a double vanity or a spacious walk-in shower, making sure it feels just right.
Confidently pick out finishes: We let buyers customize their homes by getting to pick their flooring, countertops, cabinets, tile, and more, knowing the plumbing foundation is already set to support your design perfectly.
This process closes the gap between the technical "what is rough-in plumbing?" question and the personal "this is my dream home" feeling. It helps prevent expensive, last-minute changes and makes sure the finished space is a perfect reflection of you.
If you’re ready to stop guessing and start designing a home in White Marsh, Edgewood, or anywhere across Baltimore County and Harford County, Maryland, let's talk. I'd love to show you how our unique approach makes all the difference.
Common Questions About Rough-In Plumbing
Anytime you're building or remodeling, a million questions pop up. When it comes to the guts of your home's plumbing, we hear the same ones all the time. Let's clear up a few things about this crucial behind-the-scenes stage.
How Long Does Rough-In Plumbing Usually Take?
You can expect the plumbing rough-in to take about 3 to 5 days for a typical single-family house. Of course, this can shift depending on the size of your home and how complex the plumbing layout is. For example, a home with four bathrooms will naturally take longer than one with two.
It’s a tightly scheduled part of the build. This all happens once the framing is complete, but before the insulation and drywall go up, giving plumbers open access to run all the pipes.
Can I Move a Toilet After the Rough-In Is Done?
In theory, yes. In reality, it's a huge pain.
Moving something like a toilet means tearing up floors or cutting into walls to relocate that big drain pipe. It's a messy, expensive job, which is exactly why we put so much emphasis on getting the layout right from the very beginning. Using a visualizer to confirm your bathroom layout first can save you a massive headache later.
What Is a Plumbing Stub-Out?
Ever see those capped-off pipes sticking out of the wall or floor in a house under construction? That’s a stub-out.
Think of them as placeholders. They’re installed during the rough-in and mark the exact spots where your sinks, toilets, and showerheads will eventually connect. For instance, you'll see two small pipes and one larger one stubbed out from the wall where your bathroom vanity will go—for hot water, cold water, and the drain. They just sit there, waiting for the final fixture installation.
At Customize Your Home, we're all about nailing the details from day one. Our unique visualization tools let you see and approve every fixture location before a single pipe is cut. This guarantees a smoother build and a home that truly fits you.
To see how our hands-on approach works here in Maryland, check us out at https://www.customizeyourhome.com.
Comments